
Looking for the best and easy method about how to add custom font to WordPress website?

If you’re looking to elevate the aesthetics of your site and make it more visually appealing to establish a unique brand identity, using a unique font is very important. It influences the overall looks of the website and delivers a better user experience.
While WordPress themes provide many built-in fonts, the real magic happens when you introduce your own custom fonts that resonate with your brand identity.
In this tutorial, I’ll show you the entire process of adding custom fonts to your WordPress website clearly. So, let’s dive in!
Also read: How to add social icons to WordPress website?
Where to download custom fonts for WordPress?
If you want to add custom fonts for your website you must need to download them from a third-party website or buy it. But the question is where do you get the custom fonts for download?
Well. If you search the internet with your selected font name, you will get many websites to download it for free. If you want you can buy the font from the owner.
Font Squirrel, DaFont, FontSpace, Fonts.com, and 1001 Free Fonts are very popular websites where you can get high-quality fonts for both personal and commercial use. From those websites, you can download your selected fonts for free.
Besides you can use Google fonts where more than 900 font families are available. If you want to buy premium fonts, you can buy from Envato Elements where 28K+ fonts are available.
Also read: How to Reset WordPress Website?
How to add custom font to WordPress site?
Adding a custom font to a WordPress website is easy. There are two methods available: The manual method and using a plugin. Here I will show you two methods to add a custom font.
Add custom font to WordPress website manually.
To add font manually, you need your hosting cpanel access so that you can upload your font to the “wp-content” folder. You can also upload font by installing a file manager plugin and when the font is successfully added, you can delete the plugin. So let’s add the font:
Download the font that you want to use for the website. It may download as a ZIP file and you need to extract it to get the font file. You will get font as .OTF, .TTF, .WOFF etc. format.
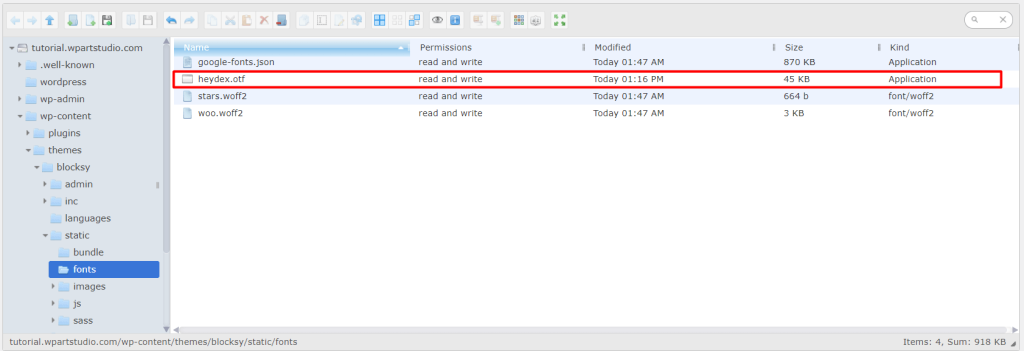
Now upload the font to “wp-content/themes/your-active-theme/fonts“.
Now go to Dashboard → Appearance → Customize → Additional CSS and paste the code below. You must replace the font family and URL, with your uploaded font.
@font-face { font-family: Heydex; src: url(https://tutorial.wpartstudio.com/wp-content/themes/blocksy/static/fonts/heydex.otf);}

Now write the code to apply font for specific tags or text. For example, the following code would apply Heydex font to our website’s all h2 tags.

Now click on the “Publish” button to publish the font.
Add custom font to WordPress using plugin.
If you have no coding knowledge or don’t want to write any code, this method is perfect for you. You just need to add a plugin to add custom fonts. So let’s see the process:
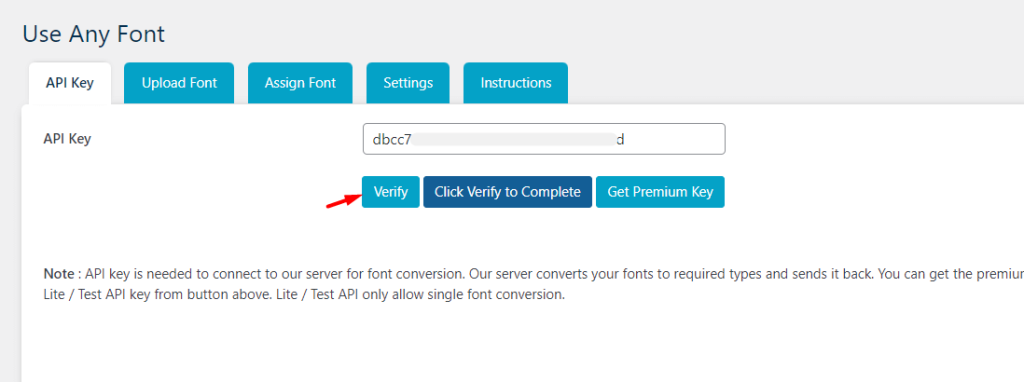
First, we need to install a plugin. Go to WordPress Dashboard → Plugins → Add New and search for “Use any font”. Now Install and Activate the “Use any font” plugin.

After activating the plugin, go to Dashboard and you will see a new menu called “Use any font”. Click on it. Now generate the API key by clicking the “Generate Free Lite / Test API Key” button and verify it.
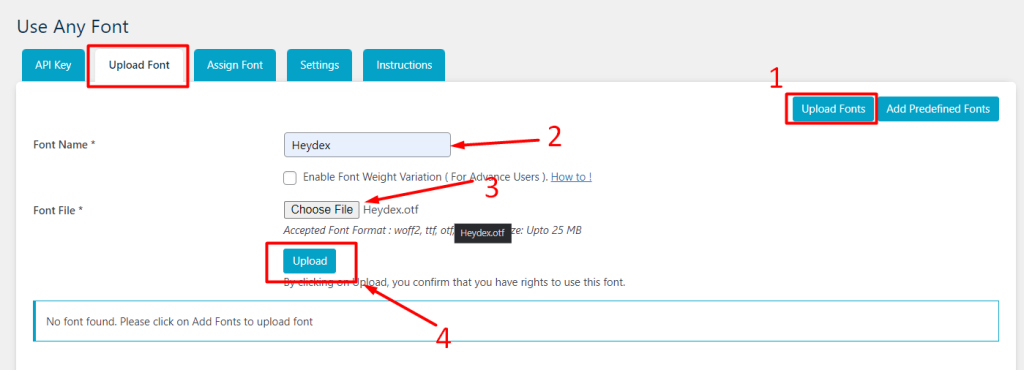
Once verify done with the API key, go to the next tab Upload Font → Upload Fonts. Now provide the font name, choose the font file, and click on the “Upload” button.
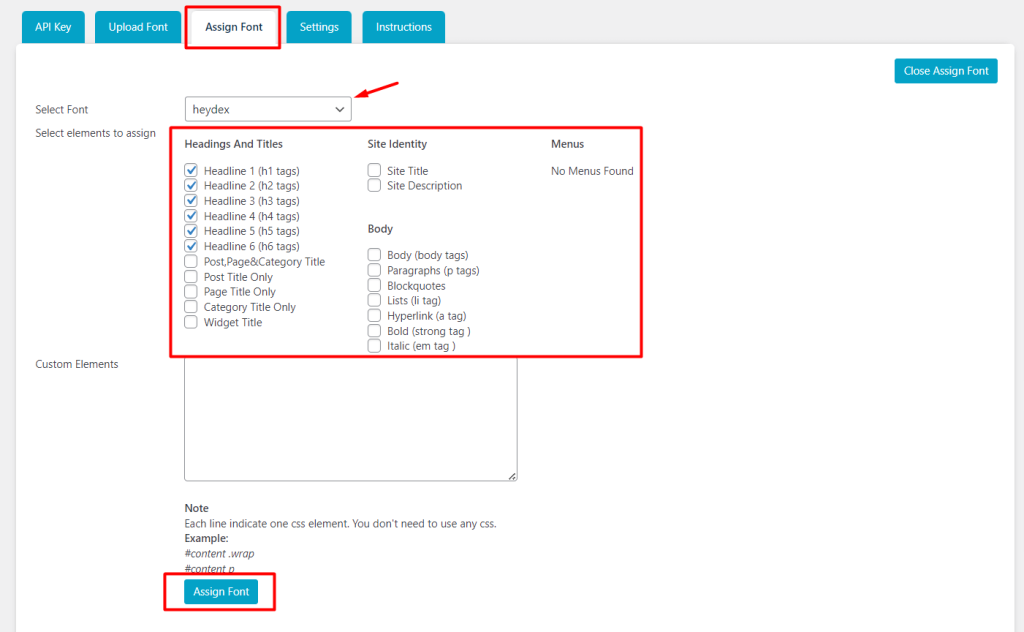
Now let’s assign the font to our website. Go to the “Assign Font” tab and click on the “Assign Fonts” button at the top right.

Now you will see some checkbox to assign the fonts. First, select the font that you want to use and then select where you want to assign the font. Once checked the boxes, click on the “Assign Font” button.
So, we successfully added a custom font to our website.
Also read: How to create new user in WordPress?
Conclusion
Adding custom fonts to your WordPress site can significantly elevate its design and user experience. It also allows you to create a unique and visually appealing website that reflects your brand identity and captivates your audience.
Above, I tried to explain the process easily so that you can add custom fonts to your site without any coding or technical knowledge. But if you have coding knowledge, you can add fonts manually. But I always suggest you add a font using a plugin because you can easily add and delete any font.
So I hope you will clearly understand how to add custom fonts to the WordPress website. If you face any issues, comment below. Continue reading more articles from OUR BLOG.