Hello Guys, Welcome back to another new tutorial. In the previous article, I taught you how you can install WordPress on localhost. In case you miss it or if you want to read that article you can read it from the link below. Today I am going to teach you all about WordPress Dashboard. So it will be a Complete WordPress Dashboard Introduction.

If you did not set up your WordPress yet and want to set up WordPress on Localhost. You can check my Previous Article: Install WordPress on Localhost.
WordPress is one of the finest and coolest CMS. So It’s really easy to work with WordPress. Even if you are non-techies. So Let’s get started and know all about the WordPress dashboard.
WordPress Dashboard Introduction
Before explaining every option, I would like to request you to check the image below which is actually a fresh Dashboard image. I have marked every option by numbers. So Just look around the dashboard and try to remember the names. Don’t worry if you can’t. I will explain each and every option one by one.
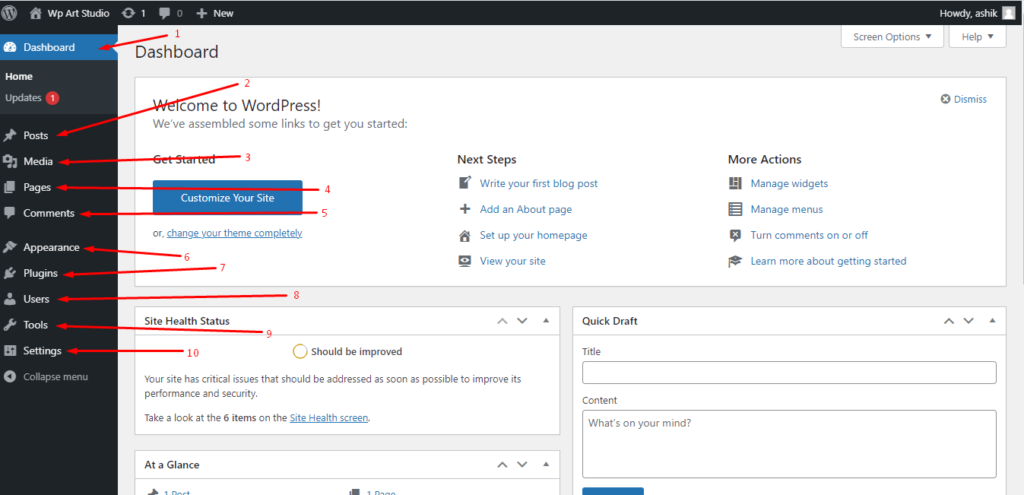
Okay one more thing, I would like to share which is if you just follow my previous article then you already installed the WordPress on localhost. So to get a WordPress dashboard or access it you must have to log in as an admin. So you have to just type domain/wp-admin
If you want to access your dashboard from the localhost then it should be localhost/projectname
Or if you want to access the dashboard from your live server. Then you just have to add /wp-admin right after the domain name.
I think you are clear about it and point out how actually you will get the WordPress dashboard access. So without further information, let’s learn about the Dashboard. Let’s go.
1.Dashboard
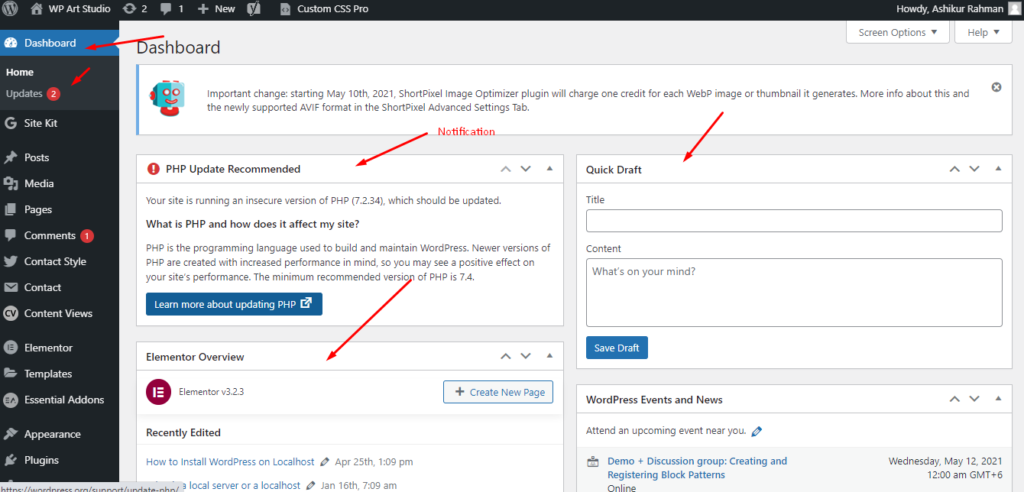
In this WordPress Dashboard Introduction, I would like to start from the very first option you will get once you will log in as an admin. And on the right side, you will get a couple of widgets like site health, welcome message, activity, Quick Draft, etc. Basically, this option will not give you any major action. But you will be notified about the site’s issues and updates. And you will get a few options to do some tasks like creating pages, creating posts that are it.
2.Posts
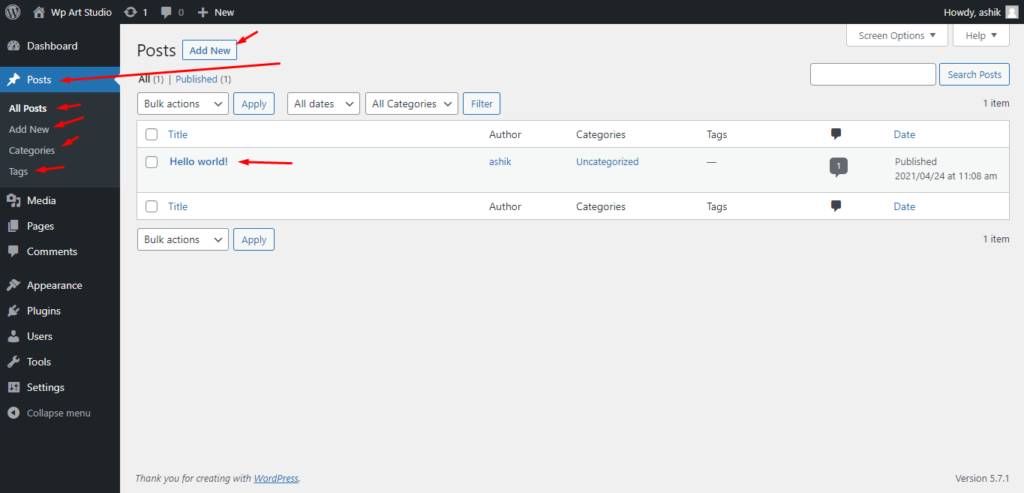
The number two option is Posts. This is a very important option. By using this option you can manage your blog posts. Even now you are reading my blog posts which are actually created by this option. You can add a new post and you can delete your post. And when you will create a new post by clicking on add new you will get a nice editor to simplify this job. Though the default editor is a classic editor, there are many page builder plugins that can change your blog post design completely. And most of the page builders support drag and drop functionality. I will talk about the page builder later in brief with another article. But if you are very new to WordPress, then I will recommend you to use the default editor to make you strong enough on blog post design.
Inside the posts option, you will get 4 more options called All posts, Add New, Categories, and Tags.
2.1 All Posts
All Posts option will show all the posts you created. And you will be able to manage all the posts as you can edit, You can delete and you can sort over the posts. There have many more functions under this All posts option
2.2Add New Post
The Add New Post option is basically for creating a new post. As soon as you create a new post button you will get a rich text editor where you can get bunches of options to design your post. As I said that this editor is a classic editor but it’s actually not. A few versions ago WordPress had the classic version of the editor. But if you install the WordPress updated version then you will get a rich and powerful page builder which can help you to design outstanding posts and pages. And it’s all about drag and drop facilities. A post has many things that you need to remember.
- A Post will have a Title
- A post must have a Permalink
- A post should have the description or body
- A post should have the category
- A post can have the tags
Those are the major and primary things related to the Add new post. But there are more options around when you will create a new post.
2.3 Categories
Categories are the 3rd option under the Add new post. This is basically a taxonomy. By default, WordPress has two taxonomies. One is Categories and the other is Tags. Suppose You are an author of a Technology Blog. So When you write a blog post you need to categorize it like the post can be a Physics-based article or can be Chemistry based. So you can organize your post by their categories.
2.4 Tags
Tags are the last option under the add new post. Actually, tags and the category both are the taxonomy of WordPress and both are default taxonomy. The major difference between categories and tags are Categories are meant for the broad grouping of your posts. Categories are hierarchical which means you can create sub-categories. On the other hand, Tags are meant to describe specific details of your posts. Think of these as your site’s index words. They let you micro-categorize your content. Tags are not hierarchical.
3. Media
The Number 3 option is Media. This is one of the important options among all others. This option will help you to upload your files including images and any other file. And later on, you can insert it on our posts or pages.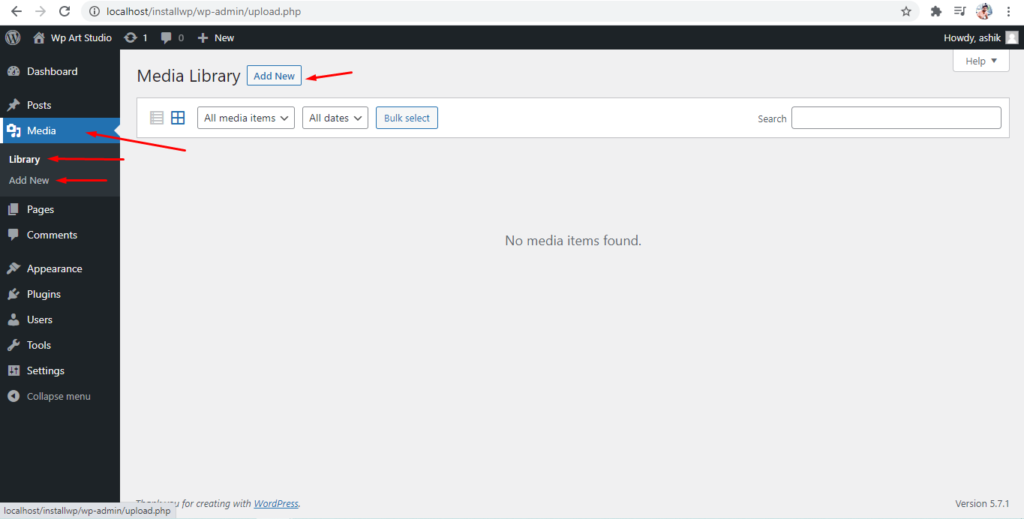
You will not get many options over here. Just a Library and Add New option under the Media. The library will show all of the media files you will upload. And the new option will allow you to upload your new media. You will do some actions like delete, add title, add alternative text to your file after selecting a media file.
4. Pages
Pages are the number 4 option inside the WordPress dashboard. It’s also a very important option that you have to use often. The nice pages or landing pages you are seeing in websites everything is basically designed using this page option and obviously by the helping of powerful page builders like elementor, visual composer, etc.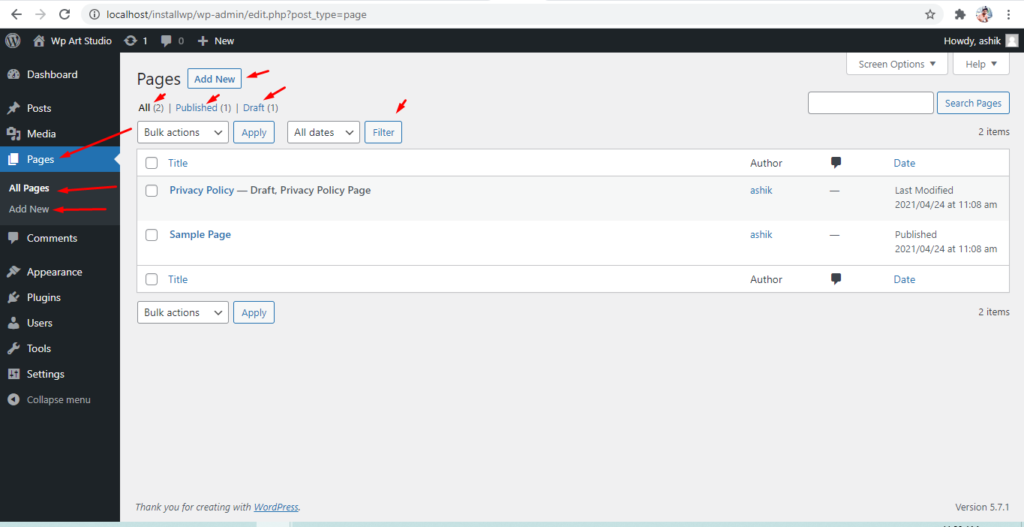
There are two main options here One is for showing all the pages you have created already which are all posts. You are able to delete, edit or trash your post from this option. Another is the Add New option. I think it’s already clear to you as to its similar concept of posts. You can create a new page from this option.
5. Comments
Comments is the number 5th option inside the WordPress dashboard. It’s basically related to the blog posts. I mean When you create any blog post and it will be visible to your audience then they will be able to place the feedback over your article.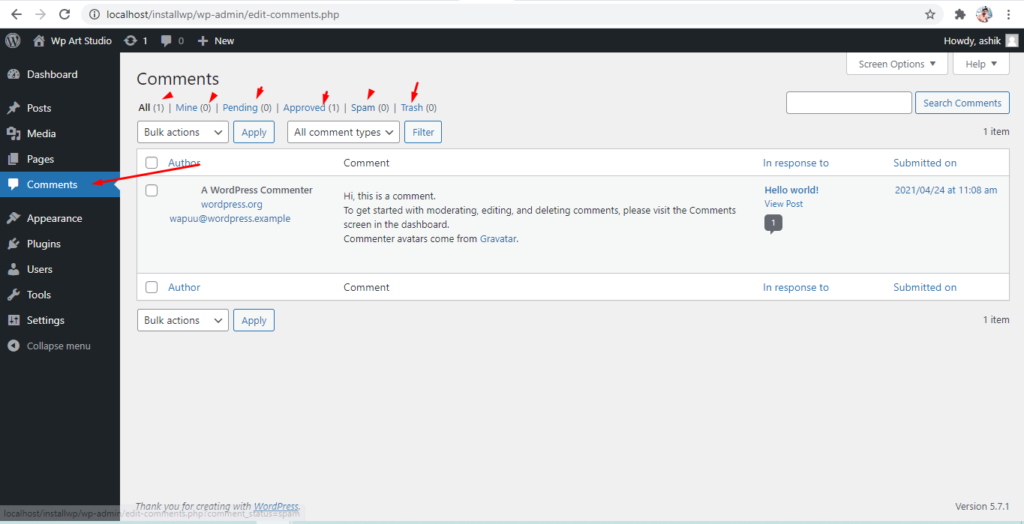
And from this Comments option, you will be able to see all the comments. Even if you want to mark any comment as spam you can do that as well. And after placing any comment, it will directly not be published. It will be waiting for approval. Once you approve the comment, it will be published.
6. Appearance
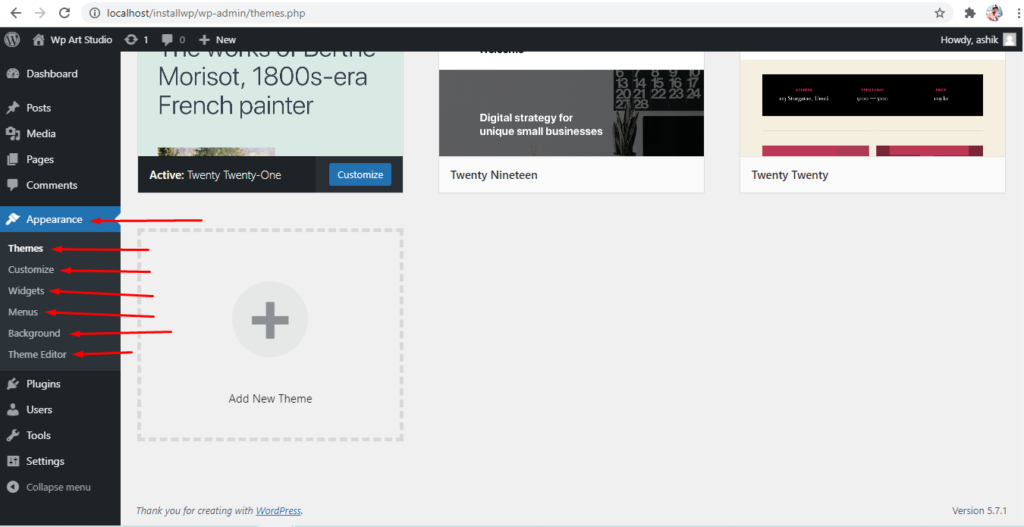
Appearance is the number 6th option inside the dashboard. And it’s a very important option among all others. The design you see on the WordPress website is everything because of this option. It has a couple of important sub-options which are given below.
- Themes
- Customize
- Widgets
- Menus
- Background
- Theme Editor
6.1 Themes
The theme is actually the front view or design of WordPress. That means whatever the content is you can still change your website design. There are thousands of WordPress free themes that allow you to make your site more professional and outstanding. There are two kinds of themes available, one is a free theme and another is a premium theme. If you think your free theme is not professional for you or not looking good. Then you can choose a premium theme. In another blog, I am planning to write an article about free and premium themes. And I will write about some best WordPress free and premium themes.
Adding a free theme to your site is very easy. And as a newbie, I will recommend you to use a free theme to learn how it works. Even if you just give enough time then you will get many free themes that are actually more professional rather than premium themes.
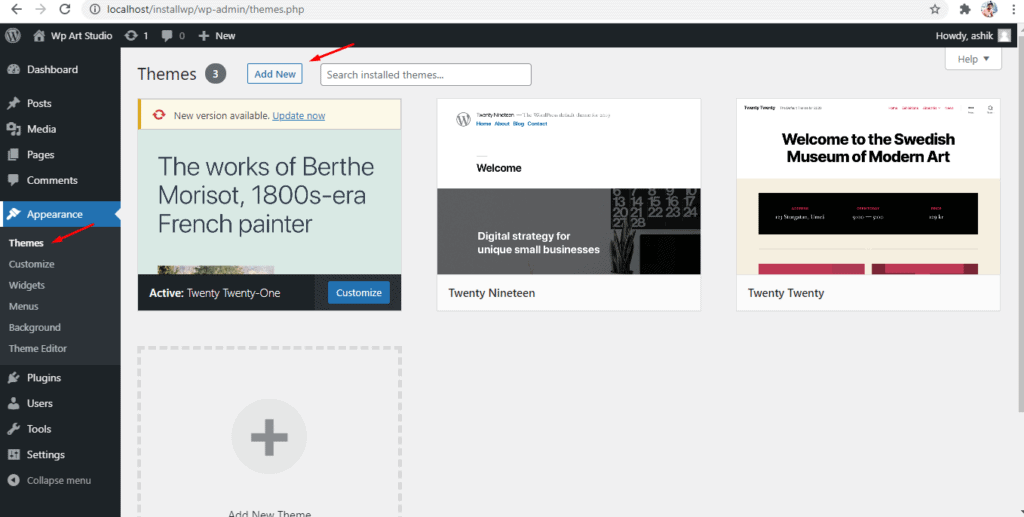
For adding a new theme you have to click on the Add New Button which is marked on the image. After clicking on it you will get many free themes. Just take a preview of the free theme, if you like that theme just have to click on the install button. And finally, it will be installed.
6.2 Customize
Customize is the second sub-option under Appearance. It’s more useful for customizing your site. Whatever theme you will use you must have to customize the theme to make your own. You will get a bunch of options under the customize option.

You will be able to change site color, menus, background images, and site logo, etc. The customize option depended on the theme. Different themes have different customization options. So the more themes you will practice or use the more knowledge you will gather.
6.3 Widgets
Widgets are a very important sub option under Appearance. If you visit some blog websites. Then you may notice that on the sidebar they place a recent article list, Recent comment, Social media links, Facebook or twitter page preview or you can see the Advertisement. These are basically the widgets. You will get many plugins for many purposes which you can actually use as a widget inside your site.
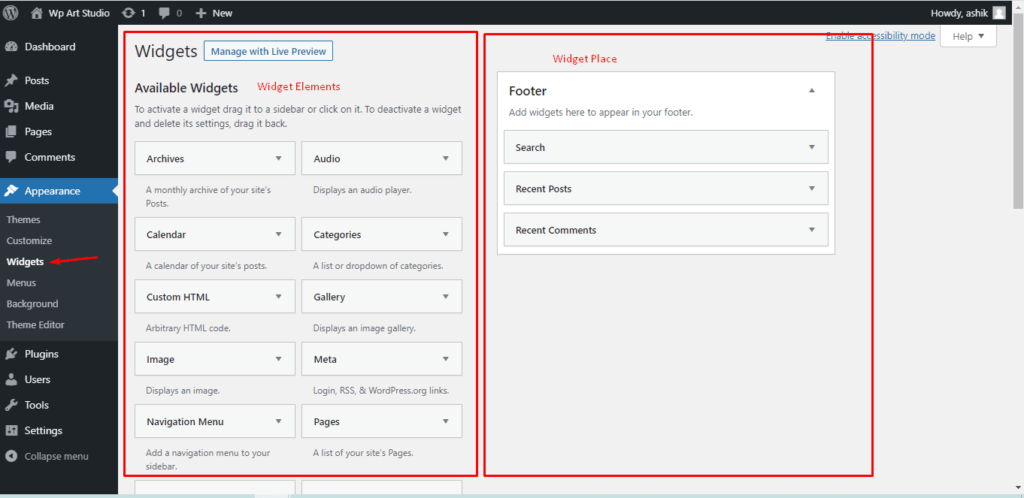
Under the widget options you will get Widget Elements and the place or location for the widget placement. Currently you are seeing the footer location. So if you want to add a widget on footer just drag a widget element and drop into the place or location. And it will be visible on the footer. Widget locations can be in many places. Maybe this theme has only the footer location for the widget placement. But other themes may have the header location and sidebar location.
6.4 Menus
WordPress Menus is very important and you all know about it. If you visit some site you already noticed that there are many pages linked on the top of the website like home, about, services, contact, etc. These are basically the menus.
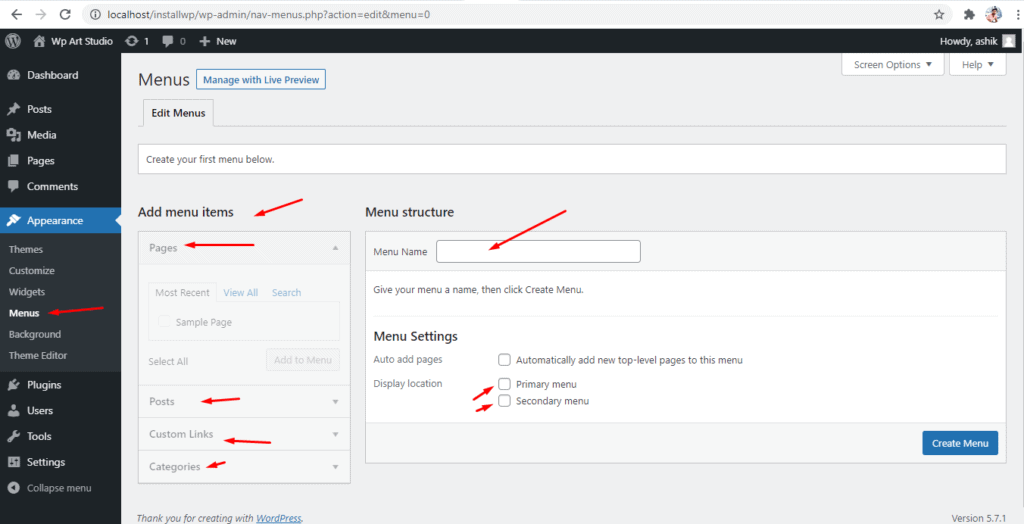
The Menu has different portions. And you have to know all about those properly. A menu must have the items right? So you will find it on the left side which I marked already. But After installing a fresh theme you will find it inactive. For activating it you have to create a Menu first which I have mentioned on the right side. Just put a menu name and click on the create menu. Once you will create a menu then you will get the Add menu items activated on the left side.
After activating it you will just select the pages and click on the add to the menu button and finally, it will arrive on the right side. After adding all the menus you must set a location for this menu. You will see that I already marked two options, one is the primary menu and another is the Secondary Menu. These are the menu locations. If you select the primary menu and click on the save menu then it will appear on the top. And if you select on the secondary menu then it may appear on the footer based on the theme menu registered place.
6.5 Background
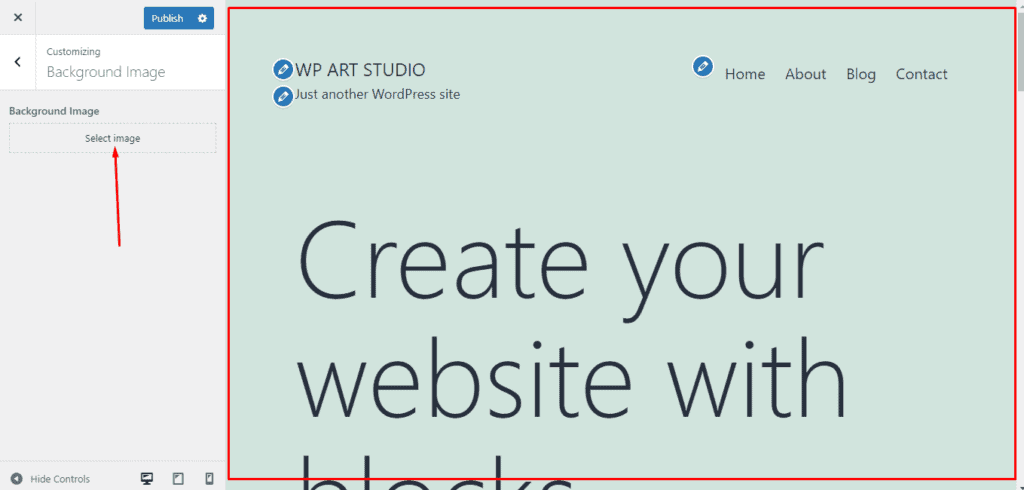
The Background is the number 5 sub-option under the appearance. You can change your full site background from this option. You can actually use the background image for the whole site.
6.6 Theme Editor
This is Basically the Last option of the Appearance. And this option is for the developers only. They can change the code from the editor to solve their problems. And I am not going to talk much about it.
7. Plugins
Plugins are the most useful and important option in the WordPress dashboard. The plugin allows users to extend their website functionality. Like the theme, it also has a free and premium version. In the WordPress org directory, there are thousands of free plugins available which you can use to extend your website functionality. Plugins has three sub-options called Install Plugins, Add New, and Plugin Editor.
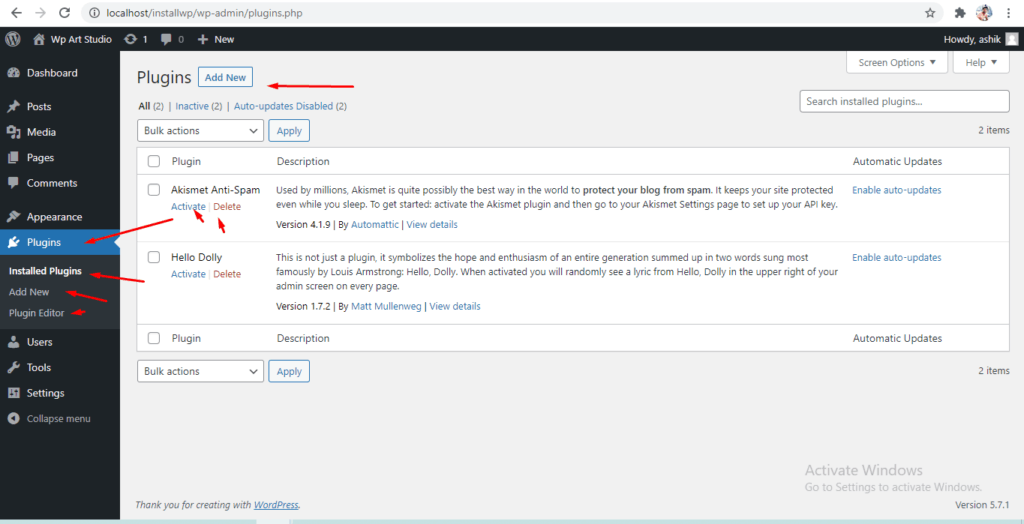
Install plugins are the options where you will get all the installed plugins. You will be able to delete or update from the installed Plugins.
Add New option allows users to install a new Plugin. Once you click on the add new button you will get thousands of plugins available from the WordPress directory and all plugins are free.
Finally, the last option is Plugin Editor. This option allows editing the plugins core files which is actually the job of a developer.
8. Users
User is the number 8th option inside the WordPress dashboard. And it’s very important for managing the users who are registered on your site. As you are an admin on the site So you can edit your profile and set all the information. And if you have multiple users on your site you can edit those users to change their roles. It also has the 3 sub-options called all users, Add New, and Profile.

The first sub-option is the All Users which is basically the list of all users. You will see all the registered users here. And you can do all the actions you need over them.
The second sub-option is the Add New. And This option allows you to create users on your site. While creating the user you can set the different roles over that user. Roles can be subscriber, can be editors, can be contributors or even can be the administrator. If you set a user as administrator then they have the same rights which you have.
And The third Option is Profile. This option allows me to edit my own profile. Suppose you are logged in as admin. If you clicked on this option then you will be able to change all the information related to your profile. You can add a profile picture, you can set a nickname of yours and so many things you can do with it.
9. Tools
Tools are very less important. Though it has some cool features, I am going to talk about this for now. Maybe it will be explained in another article when I will do some real tasks which are related to the tools option. So For now I am going to skip it.
10. Settings
The setting is the very last option of the WordPress dashboard. And it has some sub-sections. Some of those are important and some of those are not important. You don’t need more of those options in your entire WordPress journey. So I am going to talk about some major options under settings.
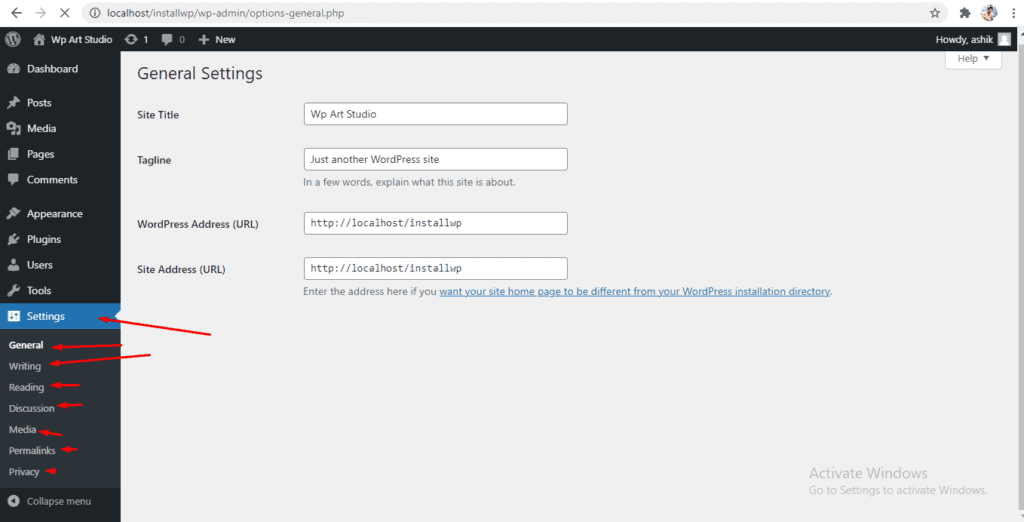
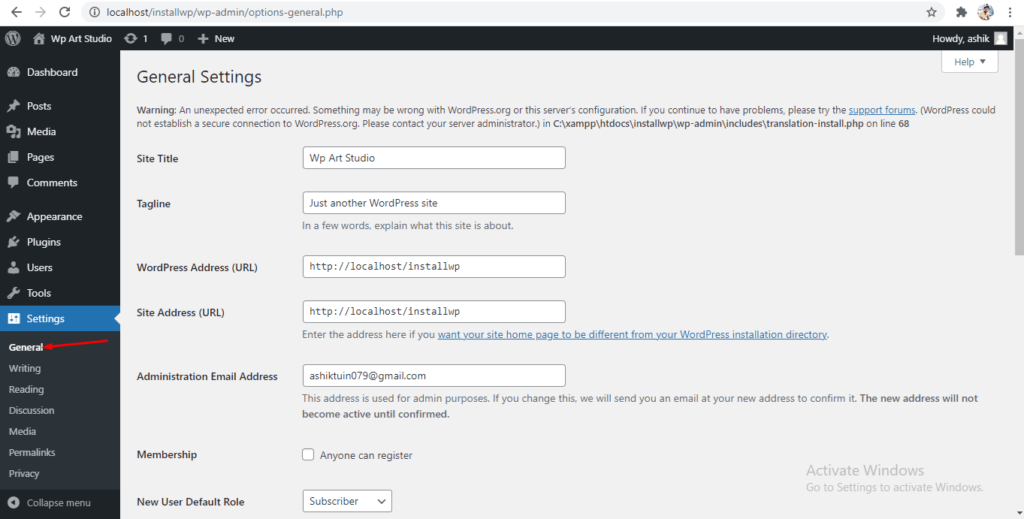
10.1 General
General is an important option from which you can change your website information like Site Title, tagline, Site Address or URL, Site admin email, etc. If you just look around it you will get all the points
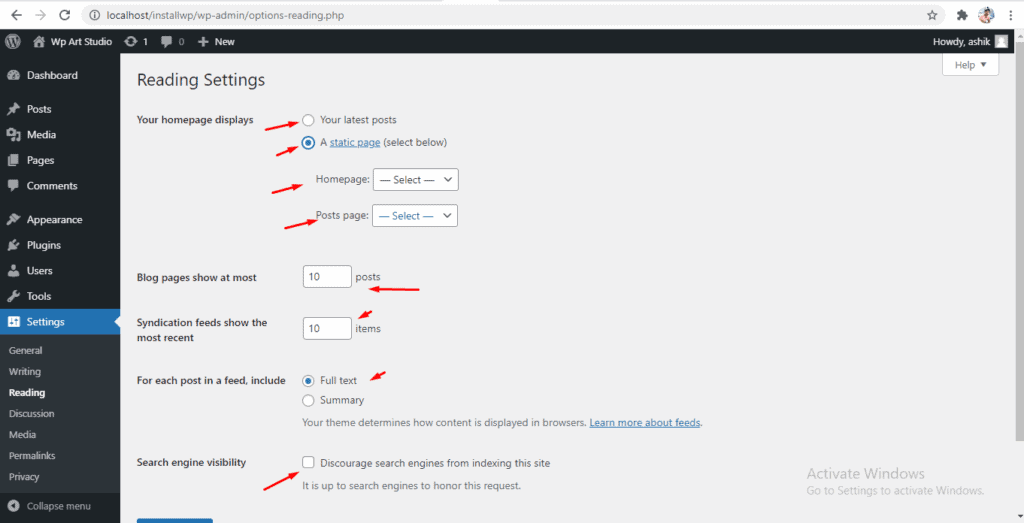
10.2 Reading
Reading is another important sub-option under settings. You can simply set your custom home page and blog page from this option. Besides this, you can set the blog posts count number from there. I mean how many posts you want to see on the blog page. You can even set the search engine visibility from this option. If you checkmark Discourage search engines from indexing this site, then it will not allow you to index your site on google.
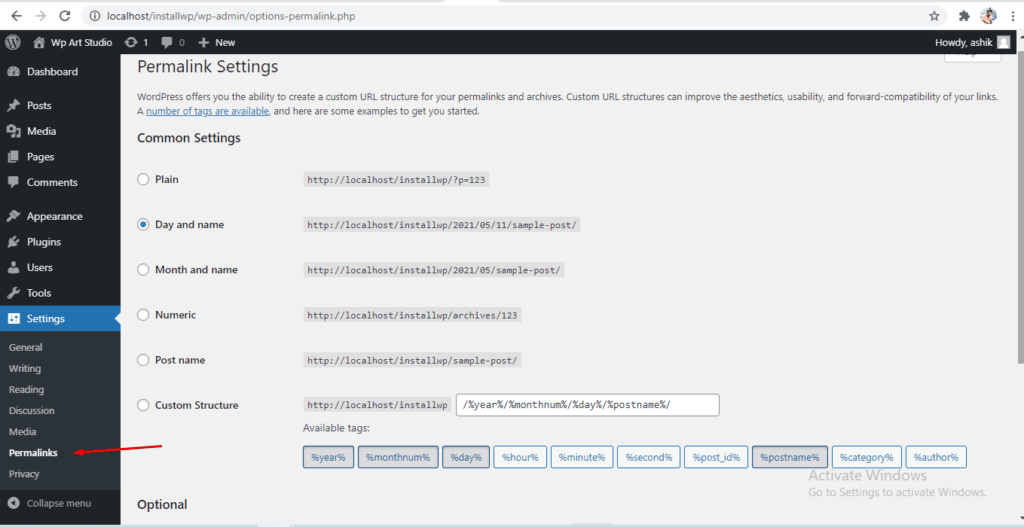
10.3 Permalinks
Permalink is another important option for the site. You can set your link structure from there. It has many structures called plain, date, and name, month and name, numeric, post name, and custom structure. Among all of them, the Post name structure is more SEO-friendly.
So here is all About WordPress. I think if you just look around every option and see it one by one, the concept will be clear. From the next tutorial, I will talk about WordPress themes and plugins.
Here is the list of my previous articles. If you want you can read this as well.
Why you should learn WordPress in 2021
What is a local server or a localhost
How to Install WordPress on Localhost
