WooCommerce is the top WordPress Inventory management and online store creation software. Using this plugin or software, you can build your online store easily. It is a very popular plugin because of its essential features and the WooCommerce custom checkout and thank you page is one of them.
But the default WooCommerce custom checkout and thank you page is very simple. So if you want to make WooCommerce WooCommerce custom checkout and thank you page more stylish and advanced, you can do it using third-party plugins.
In this tutorial, I will provide complete guidelines about how to customize WooCommerce’s custom checkout and thank you page to make it professional. Here I will use the Elementor & Cartflows plugins to customize the WooCommerce custom checkout and thank you page.
So without wasting time, let’s jump to customize the page.
Also read: How to remove shipping from checkout in WooCommerce Website?
Why do we create WooCommerce custom checkout and thank you page?
The WooCommerce custom checkout and thank you page confirms to your customers that their purchase was successful. This helps to alleviate any potential concerns or doubts about order confirmation, improving their overall experience.
The WooCommerce custom checkout and thank you page also displays important post-purchase information. Customers can see details such as order summary, shipping information, estimated delivery dates, and any other relevant instructions or guidelines. This helps customers stay informed about their purchase and what to expect next.
How to create WooCommerce custom checkout and thank you page?
To customize the WooCommerce custom checkout and thank you page, you need to complete some easy steps.
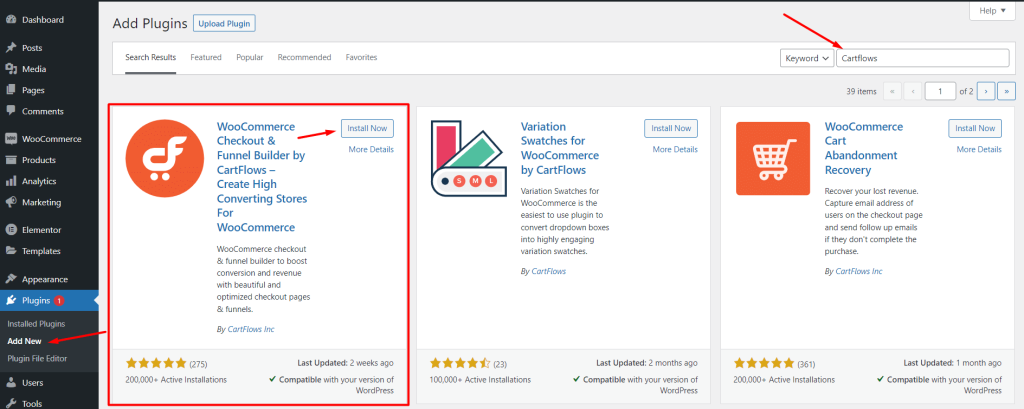
Installing the plugin
To Customize WooCommerce custom checkout and thank you page we need to install two plugins: Elementor and Cartflows. To install plugins, go to WordPress Dashboard → Plugins → Add New. Now search the plugin on the search box at the top right then install and activate the plugins.
Design WooCommerce custom checkout and thank you page.
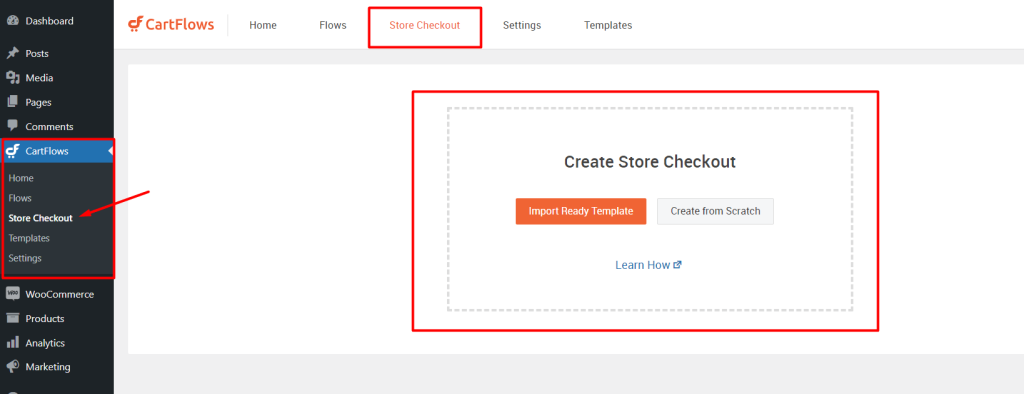
After activating the plugins, you will see the CartFlows menu on the left menu bar. To design the Checkout and Thank You pages, go to WordPress Dashboard → Cartflows → Store checkout. Here you will see two options to design your checkout and thank you page manually or import a demo template.
Create WooCommerce Checkout and Thank you page by importing the template.
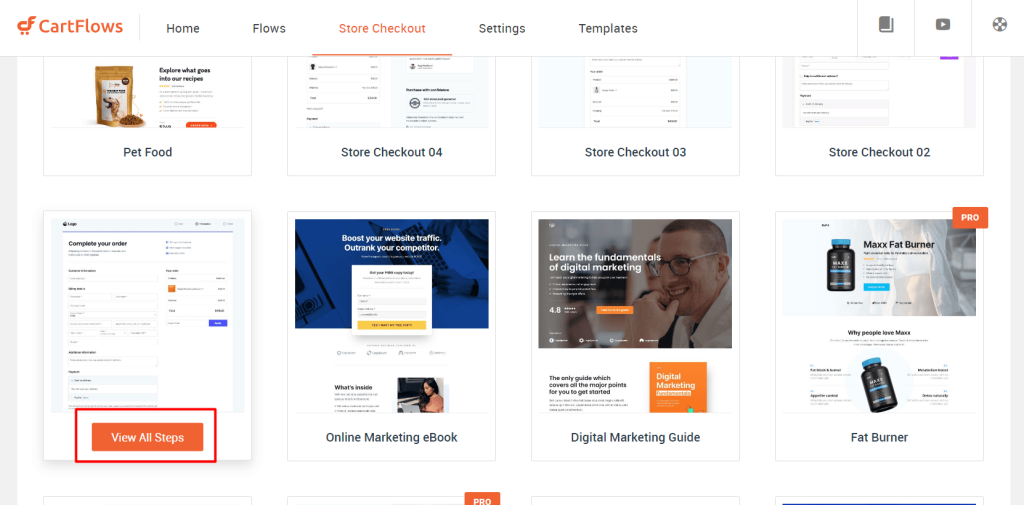
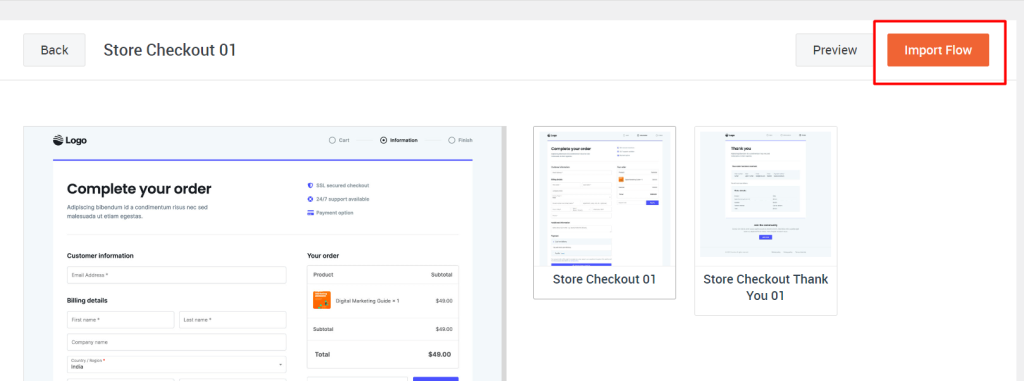
To import the checkout and thank you page template, click on the “Import Ready Template” button. You will see some checkout templates. Now choose a template and click on the “View All steps” button. Now click on “Import Flow”.
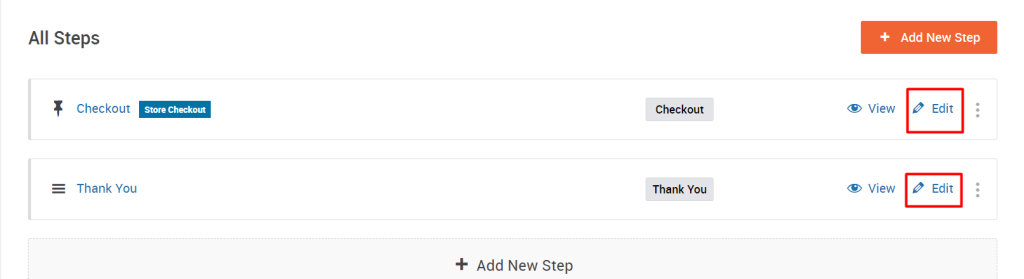
After importing, you will see two steps: Store checkout and Thank you page. If you want to design or redesign templates click on Edit → Design. This page will open via Elementor page builder and you can easily design your pages. Besides you will find Checkout widgets that are provided by Cartflows. Once it is done, Click on update at the left bottom.
Create store checkout and thank you page manually from scratch.
To create a checkout and thank you page manually, go to WordPress dashboard → Cartflows → Store checkout and click on Create from scratch. You will see a popup and click on “Create store checkout”. Now you will see the checkout and thank you steps.
To design the pages, click on Edit → Edit Design. This page will open with the page builder that you use to build your site. Now design the page and update it.
Enable custom checkout and thank you page to your website.
After designing you must need to activate the checkout and thank you page. First, go to WordPress Dashboard → Cartflows → Store checkout and enable Store Checkout.

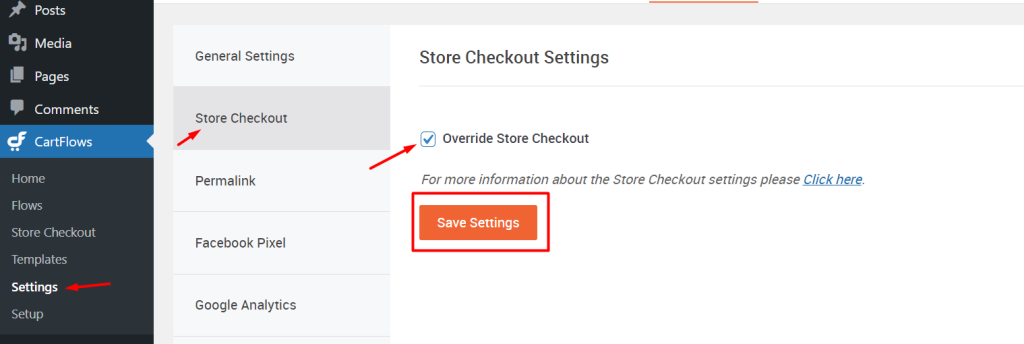
To avoid errors you can enable another setting. Go to CartFlows → Settings → Store Checkout. Check the “Override Store Checkout” option and save it.
So we successfully created our custom checkout and thank you page.
Also read: How to enable WooCommerce Add To Cart popup in WordPress?
Conclusion
WooCommerce checkout and thank you page plays an important role in enhancing the overall customer experience and making the website professional. You can easily customize and create custom checkout and thank you pages that suit your brand.
Additionally, the custom checkout and thank you page offers opportunities for upselling and cross-selling by showcasing related products or services. It can encourage customers to make additional purchases and increase the average order value. The page can also be used to engage customers further, gather feedback and reviews, and generate word-of-mouth referrals through social sharing options.
Overall, the WooCommerce checkout and thank you page is important for improving customer satisfaction, driving sales, and fostering long-term customer relationships.