
Do you need guidance on how to create contact form in WordPress?

Having contact form on a WordPress website is an essential part of improving communication with your audience or customers. It allows visitors to send you messages anytime and also makes it easy for you to reply to them or provide information and services.
With WordPress, you can easily create a beautiful contact form without any coding knowledge. There are lots of plugins that allow you to build contact forms in WordPress for free. You just need the proper guidelines.
In this article, I will provide you complete guidelines on how to create a beautiful WordPress contact form using free plugins. So without further ado, let’s get started.
Why need WordPress Contact Form in a website?
The contact form is a mandatory part of any website. You can’t find a website without a contact form. Contact form serves as a convenient and secure way for visitors to communicate with website owners or administrators. It allows visitors to submit messages directly through the website anytime.
A contact form also enhances the user experience on a website, making it easy for visitors to send inquiries, feedback, or requests without having to leave the website or switch to another communication channel. This can help to improve the chances of building trust and credibility with visitors.
How to choose the best WordPress Contact Form plugin?
When it comes to choosing the best WordPress contact form plugin, there are several factors to consider. You need to look like the plugin is easy to use and offers a user-friendly interface. Many contact form builders offer drag-and-drop features and it is very essential if you’re not familiar with coding or website development.
You also need to check that the plugin offers essential features and customization options that you need to build a contact form. Consider factors such as the ability to add custom fields, CAPTCHA, file uploads, and integrations with third-party tools.
Update and support are also important to run the contact form smoothly. Ensure that the plugin has reliable support and frequent updates, as this will help you to troubleshoot issues and keep the plugin up-to-date with the latest security standards.

Besides, you can also choose the best plugin by checking its user reviews and ratings. From user reviews, you can know about the plugin’s reliability, performance, and overall user satisfaction.
In this tutorial, I’ll use the Formanitor WordPress form plugin. I selected this plugin for some reason. It provides easy-to-use form builder, 30+ form fields, color and font modification options, multiple columns, submissions viewer, configure options for Notification and Confirmations, and much more.
You can also check our other article where we listed the best and most popular WordPress form plugins.
Create WordPress contact form step by step
Now let’s see how to create a contact form using the Forminator plugin step by step. I hope you will be able to create a contact easily after reading the article. So keep reading..
Step 1: Install contact form plugin
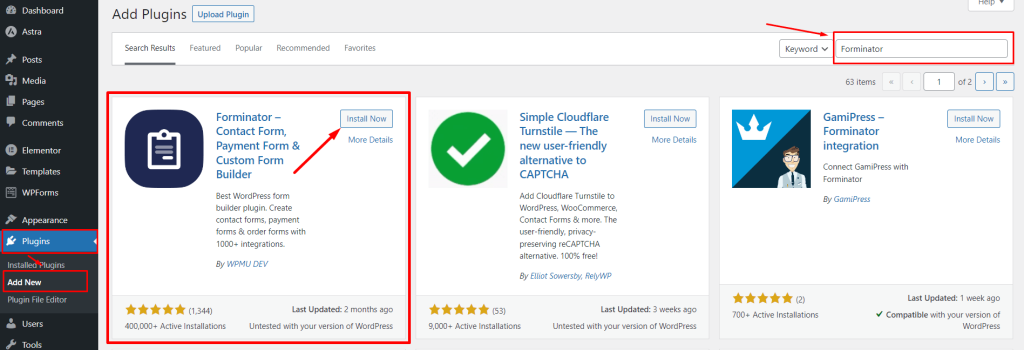
You can easily access your login panel using this link: https://yourdomain.com/wp-admin. You must replace yourdomain.com with your domain name. Then enter your username and password in the fields and click on the “Log In” button to access your WordPress dashboard. Now follow these steps:
- Go to Plugins → Add New
- Search the Forminator plugin at the top left search field.
- Click on Install Now → Activate
Step 2: Create a contact form in WordPress
In this step, I will show you how to build a contact form using the Forminator form plugin. It provides an easy to use form builder and you can arrange fields by dragging. Now follow the steps to build a form:
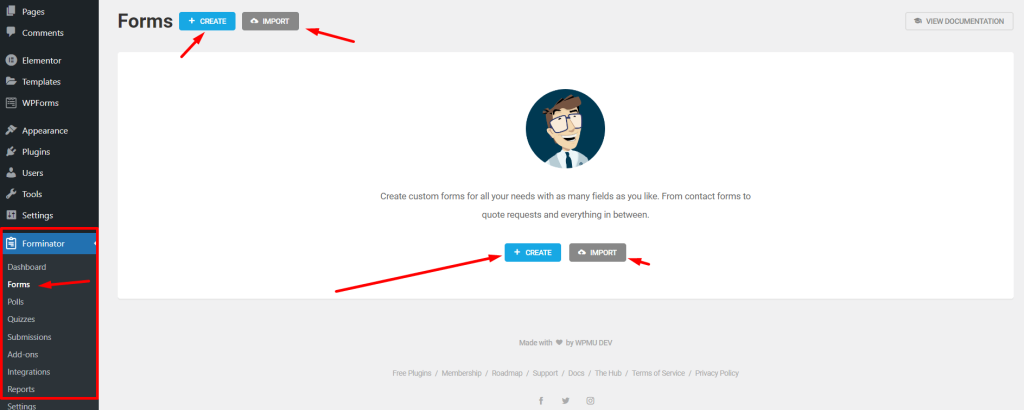
- Go to Dashboard → Forminator → Forms
- Click on Create. You can also import forms by clicking the “import form” button.
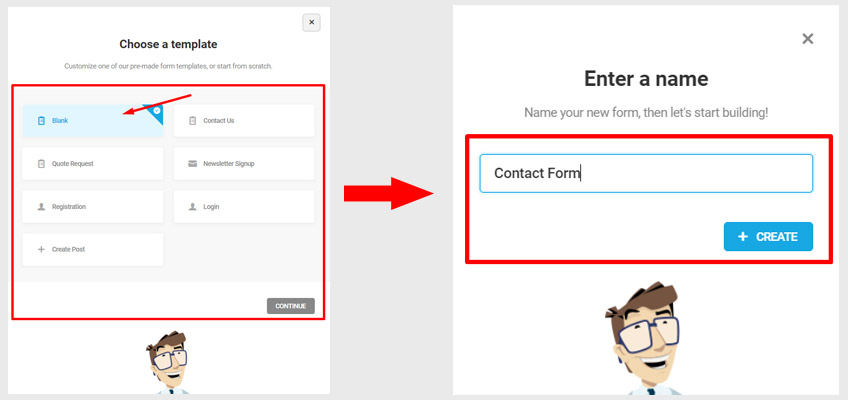
- Choose Blank or if you want a premade form, choose one form there and click on continue. Here I will show you from scratch that’s why choose Blank.
- Enter the form name and click on the “Create” button.
Now you are on the form builder page and let’s start adding fields and editing them:
- Click on the “Insert field”
- Select single or multiple fields that you need
- Click on the “Insert Fields” button
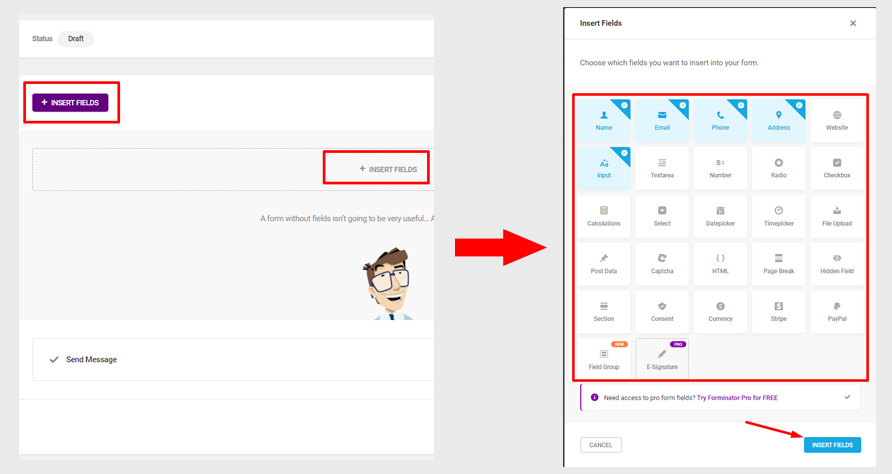
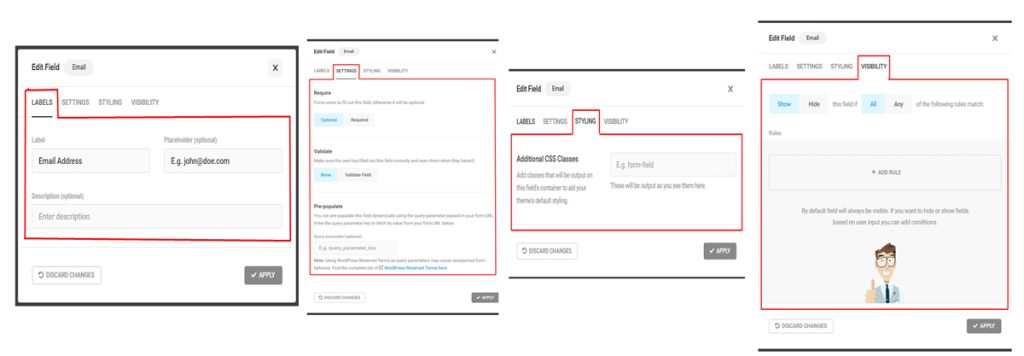
By clicking on a field, you will get a modal with options to edit specific fields labeled, placeholder, description, make required and validate, and more. This also enables you to add custom classes for styling and also conditional visibility. After editing the field, click on the apply button.
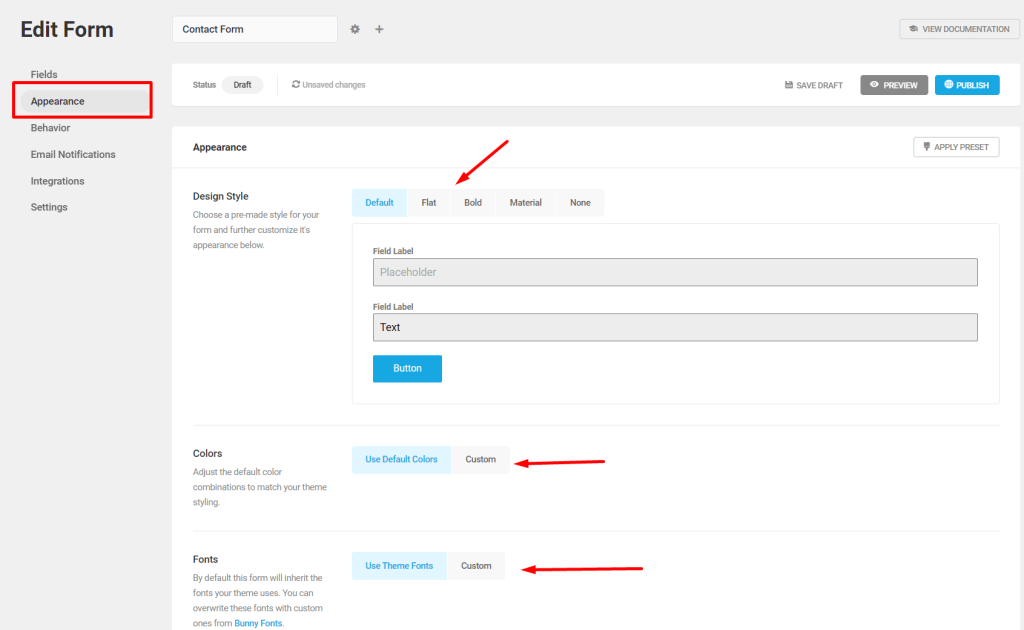
Step 3: Change the Contact Form style
Forminator allows you to change your contact form style easily. It offers 4 pre-made designs but you can also design the form as you want. You can easily set any pre-made design, change form font and color, form and field container, and also you can add custom CSS here easily.
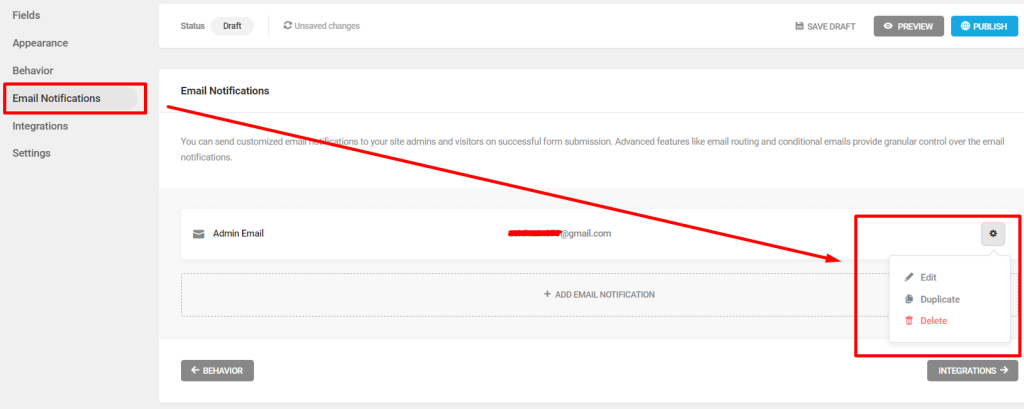
Step 4: Configuring WordPress Form Notification and Confirmations
You can easily change form confirmation and email notification. Follow the process below to change the form submit message.
- Go to Behavior → Setting → Edit Behavior → Make changes → Apply
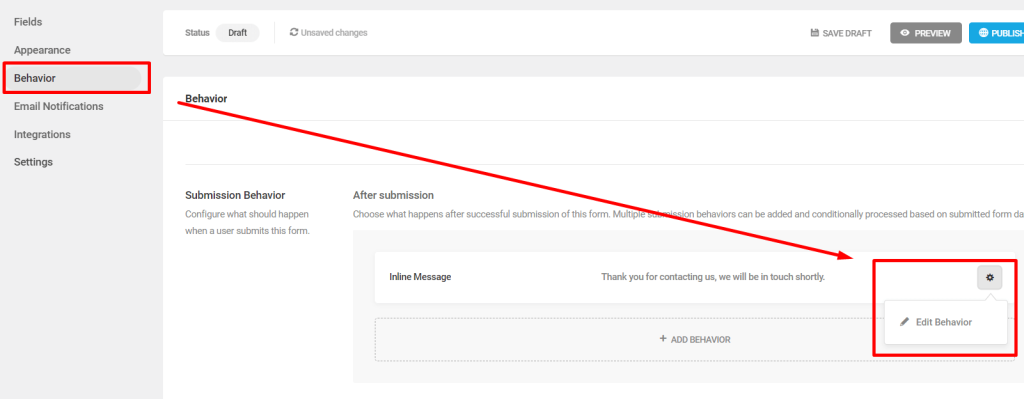
Now let’s see how to change email notification texts.
- Go to Email Notifications → Setting → Edit → Make changes → Apply
Step 5: Publish and display the contact form on a page.
So we already know how to create a form, add fields to it, and change the fonts, color, fields, etc. You will always see a publish button at the top right and click on it to publish the form. If you want, you can able to see the preview and also save it as a draft easily.
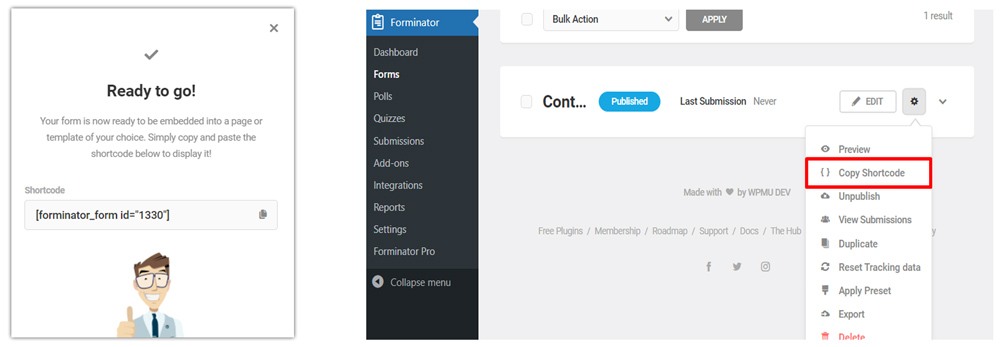
After publishing, you will see a popup with a shortcode to display your form and copy it. You can also copy shortcode from Dashboard → Forminator → Forms → Form Setting → Copy Shortcode
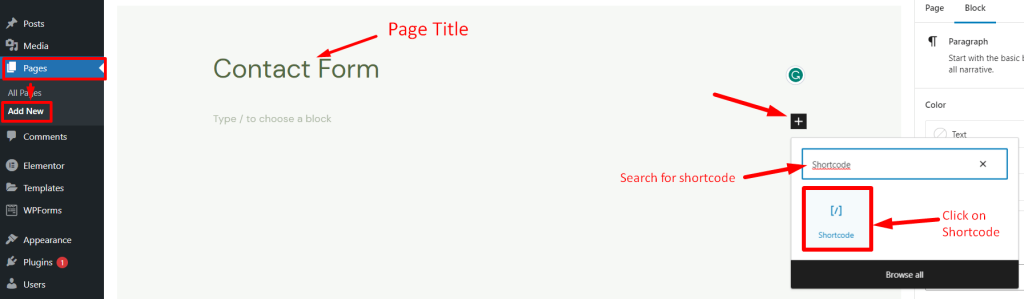
Now let’s see how to display form on a page. You can display the form on any existing pages or creating a new page. Here I will show you by creating a new page. Follow the steps:
- Dashboard → pages → Add New
- Enter page title → Click on Plus icon → Search for shortcode widget
- Paste shortcode → Publish → Visit the page
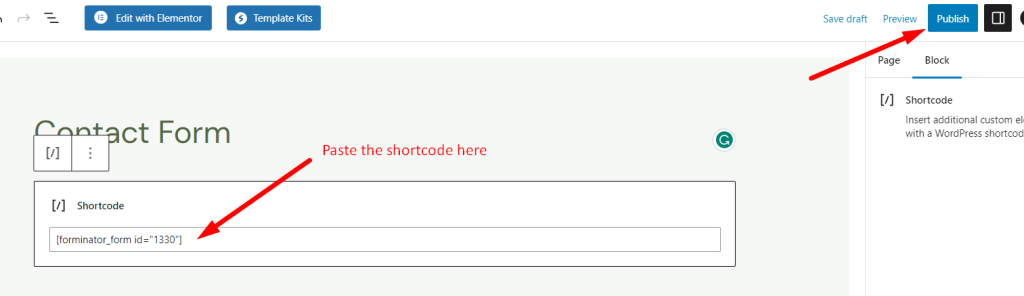
If you use other page builder, you can display the form with the same process. After publishing, the publish button changed to Update. If you make any changes you need to update again.
How to view submissions?
Forminator allows you to view all entries that your visitor submitted. It is a plus point. You can manage submissions from one place. Now see the submission:
- Go to Forminator → Submissions
- Select Form → Click on Arrow Icon at right
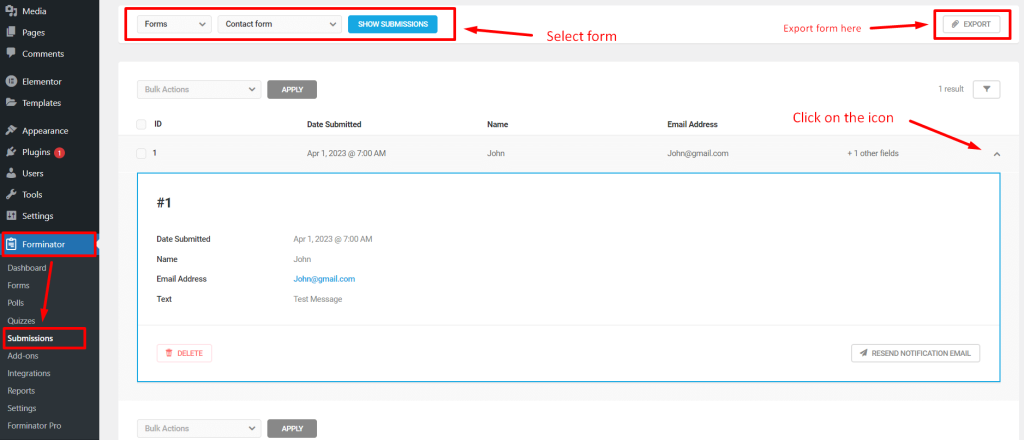
You can also export all the submissions too.
Conclusion
Creating a contact form for the WordPress website is an essential way to ensure effective communication with your audience. Creating a contact form that suits your needs is simple by using a plugin.
In this tutorial, I have discussed step-by-step how to create a WordPress contact form. We covered the basic steps of installing and activating the Forminator plugin, creating a new form, adding fields to the form, customizing the form settings, and finally, publishing the form on your website.
It’s crucial to remember that a well-designed contact form can help you gather valuable information from your visitors and clients, such as their names, emails, and messages, that can help you build stronger relationships with them.
Overall, a WordPress contact form can be accomplished quickly and easily if you have proper guidelines. It helps you engage with your audience and provide them with the necessary means to communicate with you.
I hope now you can easily create a contact form. If you have any questions leave them in the comment box.